
Contents
Introduction
Are you getting the most from your Mac in the heart of Music City? Whether you’re a professional in Nashville’s vibrant music scene, a creative artist, or a diligent student, maintaining your Mac is crucial for optimal performance. Follow these essential Mac maintenance tips, tailored for Nashville’s dynamic pace, to boost your productivity and extend your device’s lifespan.
Update Your Mac Regularly: Essential for Nashville Creatives and Pros
Regularly updating your macOS can seem like a chore, but it’s crucial for security and efficiency. Each update brings new features and includes important security patches and performance enhancements that keep your Mac running smoothly. Plus, with automatic updates, staying current is easier than ever. You have to say YES when Apple offers these updates. During a software update, your Mac will usually reboot; it is very important to restart your Mac at least once a week.
Optimize Mac Storage: Tips for Nashville’s Media Professionals
Nothing slows down a Mac more than a cluttered hard drive. Here are a few Mac maintenance tips to free up space:
- Buy a Mac with plenty of storage! When we come on-site and find a full HD, it often just means the user needs more space.
- Use macOS’s Optimize Storage feature to automatically move old files to iCloud and delete ones you no longer need. We use Enterprise Dropbox to do this with more locations on our Macs.
- Regularly empty your Trash and clear out downloads and duplicate files.
- Consider external storage options for large files like videos and high-resolution photos, especially relevant for professionals working in Nashville’s media-heavy environment.
Reliable Data Backup with Time Machine: A Must for Nashville Creatives
Safeguard Your Projects and Data with Time Machine
For anyone in Nashville’s bustling creative scene, losing digital work due to a system crash or file corruption is a nightmare scenario. Time Machine, Apple’s built-in backup software, provides a simple and effective way to prevent such losses by automatically backing up all your files, including apps, music, photos, emails, and documents.
Setting Up Time Machine:
- Choose Your Backup Disk: Connect an external drive to your Mac. This can be a USB, Thunderbolt, or FireWire drive formatted for macOS, or a network-attached storage device that supports Time Machine over SMB.
- Enable Time Machine: Go to System Preferences > Time Machine, and turn on Time Machine. Click “Select Disk” to choose the drive you want to use for backups.
- Automatic Backups: Once set up, Time Machine will automatically make hourly backups for the past 24 hours, daily backups for the past month, and weekly backups for all previous months. The oldest backups are deleted when your backup drive is full.
Restoring Files from Time Machine:
If you ever need to retrieve a file, open Time Machine from the Menu Bar (or in System Settings) and use the timeline on the edge of the screen to see snapshots of your Mac at different times. Preview files by selecting them and pressing the Space bar, and restore by clicking the “Restore” button.
Why It’s Essential:
- Version History: Time Machine keeps multiple versions of your documents, so you can recover earlier versions if needed.
- Easy Recovery: If your hard drive fails, you can use Time Machine to restore your system to a new Mac.
- Peace of Mind: Knowing your data is securely backed up lets you focus more on your creative projects without worrying about data loss.
Incorporating Time Machine into your routine is the most important of these Mac optimization tips. Time Machine ensures that your music tracks, video projects, and all-important files are safe as you navigate the dynamic and demanding world of Nashville’s creative sectors. Don’t wait until it’s too late—the best time to set up your backup is now.
Mac Clean-Up Essentials: How Nashville’s Hot Chicken Can Affect Your Keyboard
Dust and debris can hinder your Mac’s performance, especially if they block air vents, leading to overheating. Keep your Mac’s exterior clean and ensure that vents are not blocked. Software-wise, clean up old apps and software that hog resources.
How to Clean Hot Chicken Crumbs from Your Mac Keyboard: A Quick and Easy Guide

Don’t let Nashville’s famous hot chicken crumbs hinder your Mac’s keyboard performance! Over time, dust, debris, and, yes, even food crumbs can get lodged beneath the keys of your keyboard, potentially causing keys to stick or fail. One effective and fun way to clean your keyboard is by using a cleaning gel.
How to Use Cleaning Gel on Your Keyboard:
- Purchase a Cleaning Gel: These gels are available at most electronic or office supply stores. They’re often brightly colored and come in a pliable, gooey form.
- Prepare Your Keyboard: Before using the gel, make sure your Mac is turned off to avoid accidental keystrokes. Gently shake or tilt the keyboard to dislodge any loose crumbs.
- Apply the Gel: Take a blob of the cleaning gel and slowly press it onto the keyboard. Start from one end and gradually move to the other. Do not rub; press and lift. The gel will conform to the spaces between the keys and stick to any dust and particles.
- Clean and Repeat: Lift the gel, and you’ll see the dirt stick to it. Fold the gel to encapsulate the dirt, and use a clean section for the next pass. Repeat until the entire keyboard has been cleaned.
- Dispose of the Gel: Once the gel has changed color significantly and is loaded with particles, it’s time to dispose of it. Most cleaning gels are not reusable once they’re dirty.
- Final Touches: After you’ve cleaned the keyboard, use a soft, dry cloth to wipe any residue that might be left on the keys.
Cleaning gel is a quick and satisfying way to keep your keyboard pristine. It ensures every keystroke is clean and effective, whether composing music, editing videos, or writing your next big project in Nashville.
Check Mac Battery Health: Crucial for On-the-Go Nashville Users
Battery health is crucial, especially for Nashville’s professionals who rely on their Macs for mobile productivity. Check your battery’s condition by holding the Option key and clicking the battery icon in the menu bar. If it suggests replacement soon, don’t delay. Optimal battery health is key to ensuring your Mac performs well during those long sessions, whether in a café on 12th South or during a studio recording.
Disk Utility Tips: Keeping Your Mac Smooth in Music City
The Disk Utility tool is a built-in feature that helps resolve various disk-related issues. You can use it to repair disk permissions and fix common errors that might slow down your system. ONLY USE THE FIRST AIDE unless you are an expert, as you can erase the entire disk using this tool.
When should you use Disk Utility’s First Aid?
- Unexplained system behavior: If your Mac is running slowly, apps crash unexpectedly, or files become corrupted, running First Aid is a good troubleshooting step.
- External devices misbehaving: First Aid can be helpful when you face issues with external hard drives or faulty USB drives.
- Before major actions: It’s a good practice to run First Aid before significant changes, such as reinstalling macOS or major software updates.
Don’t Be the One Left Humming When the Music Stops

This is one you probably wouldn’t expect among these Mac maintenance tips. Did you know that the electronic hum in your recording studio could be from your Mac? It’s common for electronic devices, especially those with two-prong power chargers like many new Mac laptops, to emit a bothersome hum. This is often due to unbalanced power, which is prevalent with standard two-prong chargers.
Why It Happens
Many of Apple’s newest Mac laptops ship with a two-prong power charger, which does not provide balanced power. This imbalance can lead to electronic noise or humming, which can be particularly problematic in environments where sound clarity is crucial, such as recording studios.
The Simple Solution
For those in the music industry in Nashville and beyond, there’s an easy fix to ensure your Mac’s power is balanced and your recordings remain crystal clear. Apple offers a Power Adapter Extension Cable for about $20, which easily snaps onto your existing Mac power adapter.
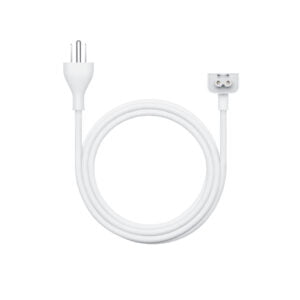
Benefits of the Extension Cable
- Balanced Power: The three-prong design of the extension cable balances the power supply, eliminating unwanted electrical noise or hum.
- Safety: It also grounds your device, adding an extra layer of safety against potential electrical hazards.
- Flexibility: Adds extra length to your power adapter, making it more convenient to plug in, even if the nearest outlet is just out of reach.
This small investment can make a big difference in your studio’s sound quality, preventing that awkward silence when the music stops and all you hear is the hum of electronics. Ensure your recordings are as clear as your creative vision by opting for balanced power with this essential accessory.
Conclusion
With these Mac maintenance tips, maintaining your Mac efficiently is straightforward, ensuring it runs fast and reliably. Thanks to a well-maintained Mac, you can dive into the rhythm of Nashville without missing a beat. For more localized Mac maintenance insights and tech support, keep following machelpnashville.com.